Table of Contents
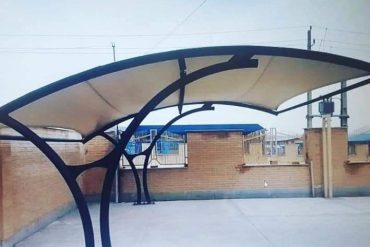
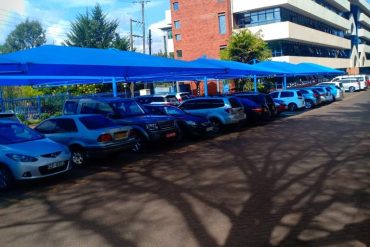
ToggleShade Sail Without Posts
If you want to install a shade sail but don’t have the budget or the space to erect posts, don’t panic — you can still enjoy a strong, stylish sun shade. Shade sails can be mounted directly to existing structures like walls, concrete columns, or even robust beams. This guide from Diamond Canopies East Africa Limited will walk you through how to install a shade sail without posts, giving you a clean, cost-effective shade solution.
Why Install a Shade Sail Without Posts?
There are good reasons to consider wall-mounted shade sails instead of building dedicated posts:
-
Save space: Posts take up ground area; walls do not.
-
Lower costs: No digging holes or buying concrete for footings.
-
Faster installation: Using existing structures means fewer components to buy and install.
-
Neat look: A wall-mounted shade sail can blend beautifully with your architecture.
However, you must ensure the existing structures are strong enough to take the tension load of the shade sail.
What You Need
Before you get started, gather these essential materials:
✅ A quality shade sail
✅ Stainless steel fixing hardware (eye bolts, turnbuckles, snap hooks, pad eyes)
✅ Masonry anchors (for concrete/brick walls)
✅ A power drill with masonry drill bits
✅ A spanner or wrench
✅ A measuring tape
✅ A spirit level
Pro tip: Diamond Canopies East Africa stocks high-quality shade sail fixings you can trust in tough weather.
Step 1: Assess Attachment Points
This is critical. You can’t just screw into a random brick. Check that your chosen walls or beams can handle the pulling force of a tensioned shade sail. Each fixing point will be under significant load, especially in windy conditions.
✔ Check the wall condition — no crumbling bricks or hollow block
✔ Look for solid concrete columns
✔ Timber? Only if it’s strong, thick, and not rotten
If in doubt, get a structural engineer to confirm.
Step 2: Measure the Area
Plan the layout of your shade sail carefully. It should slope slightly to allow rain runoff, and should be tensioned so it does not flap.
-
Measure diagonals
-
Leave enough space between the corners of the shade sail and the attachment points for your turnbuckles (usually 300–400mm)
-
Double-check height differences to achieve a slope (min 10% grade recommended)
Step 3: Mark the Fixing Points
Use a pencil and a spirit level to mark where each fixing point will go. Ideally, your fixing points should:
✅ Be higher on one side for water drainage
✅ Avoid obstacles like downpipes
✅ Spread load evenly
Step 4: Drill and Fix Anchors
If working with a brick or concrete wall:
-
Drill holes with a masonry bit
-
Insert wall plugs or expansion bolts
-
Attach pad eyes or eye bolts securely
-
Tighten thoroughly
Never fix into cracked or soft mortar.
Step 5: Attach Shade Sail Hardware (how to install shade sail)
Attach your shade sail hardware to the eye bolts or pad eyes:
✅ Snap hooks
✅ Turnbuckles
✅ D shackles
These fittings allow you to tension the sail correctly and remove it easily for cleaning or storms.
Step 6: Hang and Tension the Shade Sail (wall mounted shade sail)
Hook the sail corners onto the fixings with the turnbuckles slightly loose. Once all corners are attached, gradually tighten each turnbuckle until the sail is firm, with minimal sag, and has even tension across all corners.
Check:
-
Sail edges should be straight or only slightly curved
-
Fabric shouldn’t flap
-
No corners should droop
Safety and Maintenance Tips (shade sail fixings)
-
Inspect your fixings every few months
-
Take the sail down in extreme storms or strong seasonal winds
-
Wash with mild detergent once or twice a year
Frequently Asked Questions (FAQs)
Can I install a shade sail without posts on any wall?
Not all walls are suitable. You must have a structurally sound wall, like solid concrete, strong brick, or robust timber beams, to handle the pulling forces of the shade sail. Avoid weak or cracked walls, as they could fail under tension.
How much tension should I put on my wall mounted shade sail?
You should tension the shade sail until there is minimal sag and no flapping, but do not overtighten to the point of damaging your fixings or the wall anchors. The sail should feel firm and stable.
Do I need a slope when installing a shade sail without posts?
Yes — always allow a slope of at least 10% to help rainwater run off instead of pooling in the middle of the sail. A slight slope also helps prevent wind damage.
What kind of hardware should I use to mount a shade sail to a wall?
Use high-quality stainless steel fixings, including eye bolts, pad eyes, turnbuckles, snap hooks, and heavy-duty masonry anchors for concrete or brick. These will resist corrosion and hold up under tension.
Can I use existing roof beams instead of posts?
Yes, if the roof beams are structurally strong enough. Always verify they can take the load before installing — if in doubt, consult a qualified engineer.
Do I need planning permission to install a shade sail without posts?
In most cases, shade sails are classed as temporary or semi-permanent structures and do not need permits, but it’s wise to check with your local council or building authority, especially if you are in an estate with management rules.
Is it safe to leave my shade sail up all year?
It depends on your climate. In very high winds or storms, you should take the sail down to prevent damage. Regular inspections are important to keep it safe and secure.
Can Diamond Canopies East Africa install shade sails without posts for me?
Absolutely. Our team can supply and professionally install wall-mounted shade sails anywhere in East Africa, with proper assessment of your building and top-quality fixings. Contact us for a quotation.
Conclusion (shade sail installation)
Installing a shade sail without posts is absolutely achievable if you have strong existing structures to work with. Wall mounted shade sails can save you money, space, and installation headaches, while still providing excellent shade and UV protection.
For high-quality shade sails, stainless steel fittings, and professional installation advice in East Africa, contact Diamond Canopies East Africa Limited today. Our team is ready to help you create a cooler, more comfortable outdoor space — no posts required.
🚚 COUNTRYWIDE SERVICE DELIVERIES
Diamond Canopies delivers professional installation and after-sales support across Kenya—not just in Nairobi.
📞 Contact Us
-
Email: info@diamondcanopies.com
-
Phone: +254 722 549 465
📍 We Deliver to (but not limited to):
Nakuru · Kisumu · Mombasa · Malindi · Eldoret · Kisii · Migori · Moyale · Lodwar · Marsabit · Maralal · Kapenguria · Kitale · Isiolo · Rumuruti · Webuye · Bungoma · Malaba · Busia · Mumias · Kakamega · Siaya · Luanda · Bondo · Mbita · Homa Bay · Rongo · Sotik · Bomet · Narok · Kericho · Kapsabet · Gilgil · Nyahururu · Nanyuki · Meru · Thika · Maua · Chuka · Limuru · Naivasha · Kitui · Mutomo · Kajiado · Emali · Kitengela · Oloitoktok · Garissa · Mwingi · Kibwezi · Mtito Andei · Voi · Diani · Lamu · Garsen · Kilifi · Mtwapa · Mariakani · Kikuyu · Ngong · Karen · Athi River — and many more!